
JavaScript Code Along #1: create a todo list
In this short tutorial I am going to show you how you can create a simple todo list using only HTML, CSS and JavaScript.
Before we start coding, we need to think about the features that we need and write them down on paper.
User Stories
Our todo list will be pretty simple, we want users to be able to:
- add new items to the list by clicking an “add” button or by pressing “enter”
- mark items as complete
- completed items should disappear from the todo list and go inside a “completed” list
- delete unwanted items from the list
The markup
Now that we have a clear idea of what we want to do, let’s start writing the markup for this project. I will be using something called Pug to write my HTML. Pug is a preprocessor for HTML and it will allow me to write more concise markup.
Look at how we can write more concise markup in this example.
From this:
<div class="container">
  <h2 id="title"> Title </h2>
</div>
To this:
.container
  h2#title Title
Setup Pug
You can install Pug by running:
npm install pug
npm install pug-cli -g
Now you only have to navigate to your project folder and run:
pug --watch index.pug index.html
This will tell Pug to watch for a file called index.pug and to compile it into a index.html for our browser.
Creating the structure of the todo list
We need three components in our markup:
- an
headerwith aninputtag for the user to enter an item - a section where to display tasks to do
- a section where to display tasks completed
 body
    #container
      header
        input(type="text",placeholder="Enter an activity..." id="item")
        button#add

      h2 To Do
      ul.todo#todo

      h2 Completed
      ul.completed#completed
We have a #container where we put our three components and inside of it we have an header and two ul.
Next step is to add an icon to our add button
button#add
  svg(xmlns="http://www.w3.org/2000/svg" viewBox="0 0 448 512")
    path(d="M416 208H272V64c0-17.67-14.33-32-32-32h-32c-17.67 0-32 14.33-32 32v144H32c-17.67 0-32 14.33-32 32v32c0 17.67 14.33 32 32 32h144v144c0 17.67 14.33 32 32 32h32c17.67 0 32-14.33 32-32V304h144c17.67 0 32-14.33 32-32v-32c0-17.67-14.33-32-32-32z")
The code that we added will display a “+” icon.
For now inside our ul we put nothing, that’s because we will use JavaScript to append elements to them.
The structure we will use will be like this:
ul.todo#todo
  li item1
    .buttons
      button.remove
      button.complete
Inside the li we have a div with two button, one to remove an element from the list and one to mark it as complete.
Same as before, we will use svg icons.
Style with CSS
This is how our todo list will look like:
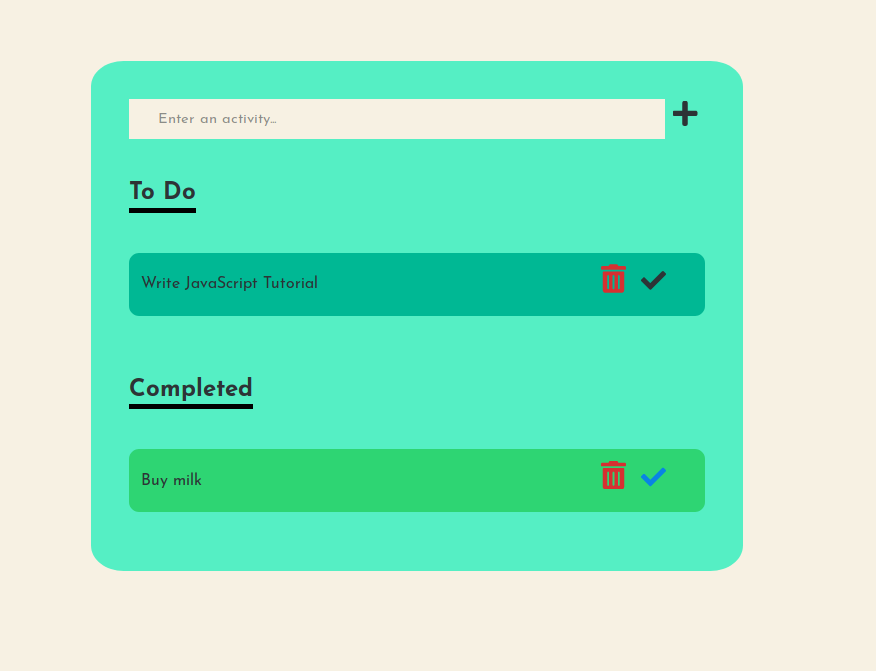
I apologize for the poor choice of colors but I am not a designer.
CSS variables
We will make use of css variables to define our main colors like this:
/* variables */
:root {
  --font-color: #2d3436;
  --body-bg-color:#f7f1e3;
  --container-bg-color:#55efc4;

  --todo-bg-color: #00b894;

  --done-bg-color: #2ed573;

  --svg-normal-color: #2d3436;
  --svg-hover-color: #0984e3;
  --svg-complete-color: #0984e3;
  --svg-remove-color: #d63031;
  --svg-remove-hover-color: #ff4757;
}
Add gogle font and style our container
Next we move on to adding our new google font and styling the body and the container:
* {
  font-family: 'Josefin Sans',
  sans-serif;
  padding: 0;
  margin: 0;
  color: var(--font-color);
}

body {
  background-color: var(--body-bg-color);
  display: flex;
  justify-content: center;
}

#container {
  background-color: var(--container-bg-color);
  padding: 2%;
  min-height: 30vh;
  min-width: 30vw;
  width: auto;
  height: auto;
  margin-top: 10vh;
  border-radius: 5%;
}
Remember to add a link to google font in our head
link(href="https://fonts.googleapis.com/css?family=Josefin+Sans:300,400,700" rel="stylesheet")
Style the h2
Now let’s style the h2:
/* we make it inline-block so that our `h2::after` will only span the length of the `h2` and not the whole row */

h2 {
  margin-bottom: 40px;
  margin-top: 40px;
  display: inline-block;
}

/* this one will add the underline that you can see in the screenshot */
h2::after {
  content: "";
  border-bottom: 5px solid black;
  display: block;
  width: auto;
}
Style the header
/* make the `header` a flex container to easily stack our elements in a column and automatically space them with `space-between` */
header {
  display: flex;
  justify-content: space-between;
}

/* give some simple styling to our `input` tag */
header input {
  min-height: 40px;
  width: 100%;
  border: none;
  padding-left: 5%;
  background-color: var(--body-bg-color);
}

header button {
  min-width: 40px;
  background: none;
  border: none;
  font-size: 2rem;
}
Style the li
/* make the `li` stretch the whole width and add some border to it*/
li {
  width: 100%;
  display: flex;
  align-items: center;
  background-color: var(--todo-bg-color);
  padding: 2%;
  box-sizing: border-box;
  border-radius: 10px;
  margin-bottom: 20px;
}

li .buttons {
  min-width: 100px;
  margin-left: auto;
  display: inline;
}

li .buttons button {
  background:none;
  min-width: 40px;
  border: none;
  font-size: 2rem;
}

/* apply a different style to the completed tasks */

.completed li {
  background-color: var(--done-bg-color);
}

.completed .complete svg path {
  fill: var(--svg-complete-color);
}
Style the SVG icons
Finally we can style our SVG icons like this:
svg {
  max-width: 25px;
}

/* define the normal color */
svg path {
  fill: var(--svg-normal-color);
}

/* change the color when we hover the icons*/
button:hover svg path {
  fill: var(--svg-hover-color);
}

/* make the remove icon red*/
.remove svg path {
  fill: var(--svg-remove-color);
}

/* make the remove icon a different color on hover */
.remove:hover svg path {
  fill: var(--svg-remove-hover-color);
}
Writing JavaScript
Now that we have a nice looking todo list it’s time to make it work.
First we will wrap everything in an EventListener to wait for our document to load before running the code:
document.addEventListener("DOMContentLoaded", () => {
  [...]
});
Define variables
Next, we will start by defining some useful variables:
// button to add new item
let addButton = document.querySelector("#add");
// input field to add new item
let addInput = document.querySelector("#item");

// add the svg icons for the buttons
let removeSVG = `<svg xmlns="http://www.w3.org/2000/svg" viewBox="0 0 448 512"><path d="M0 84V56c0-13.3 10.7-24 24-24h112l9.4-18.7c4-8.2 12.3-13.3 21.4-13.3h114.3c9.1 0 17.4 5.1 21.5 13.3L312 32h112c13.3 0 24 10.7 24 24v28c0 6.6-5.4 12-12 12H12C5.4 96 0 90.6 0 84zm416 56v324c0 26.5-21.5 48-48 48H80c-26.5 0-48-21.5-48-48V140c0-6.6 5.4-12 12-12h360c6.6 0 12 5.4 12 12zm-272 68c0-8.8-7.2-16-16-16s-16 7.2-16 16v224c0 8.8 7.2 16 16 16s16-7.2 16-16V208zm96 0c0-8.8-7.2-16-16-16s-16 7.2-16 16v224c0 8.8 7.2 16 16 16s16-7.2 16-16V208zm96 0c0-8.8-7.2-16-16-16s-16 7.2-16 16v224c0 8.8 7.2 16 16 16s16-7.2 16-16V208z"/></svg>` ;

let completeSVG = `<svg xmlns="http://www.w3.org/2000/svg" viewBox="0 0 512 512"><path d="M173.898 439.404l-166.4-166.4c-9.997-9.997-9.997-26.206 0-36.204l36.203-36.204c9.997-9.998 26.207-9.998 36.204 0L192 312.69 432.095 72.596c9.997-9.997 26.207-9.997 36.204 0l36.203 36.204c9.997 9.997 9.997 26.206 0 36.204l-294.4 294.401c-9.998 9.997-26.207 9.997-36.204-.001z"/></svg>` ;
Add event listeners
We want our user to be able to add a new item by clicking on the add button or by pressing enter. We will do so using two event listeners:
// user clicks on the add button
// if there is text inside the item field then add it to the to do list

addButton.addEventListener("click",function(){
  // grab the value of the input tag
  let  newItem = document.getElementById("item").value;
  // if the input tag is not empty then run our function to add an item
  if(newItem) {
    // this function will add a new item to the todo list
    addItemTodo(newItem);
    // reset the input after we added a new item
    document.getElementById("item").value = "";
  }
});

// user press enter

addInput.addEventListener("keypress",function(e){
  // did the user press *enter*? if yes then continue
  if (13 === e.keyCode){
    // grab the value of the input tag
    let newItem = document.getElementById("item").value;
    // if the input tag is not empty then run our function to add an item
    if (newItem) {
      // this function will add a new item to the todo list
      addItemTodo(newItem);
      // reset the input after we added a new item
      document.getElementById("item").value = "";
    }
  }
});
Now we set up our two event listeners but we still can’t add our items to the list because our function addItemTodo() has not been created yet. That is our next step.
Add items to the todo lit
function addItemTodo(text){
  // grab the `ul`
  let list = document.getElementById("todo");
  // create an `li`
  let item = document.createElement('li');
  // set the inside of our `li` the same as the parameter that we passed in the function, which is going to be the value set by the user in the input field
  item.innerText = text;

  //create container for our buttons remove and complete
  let buttons = document.createElement('div');
  buttons.classList.add("buttons");

  // create the two buttons

  let remove = document.createElement('button');
  remove.classList.add('remove');
  // add the SVG icon to the button
  remove.innerHTML = removeSVG;
  // add event listener for remove
  // this function will be definedd later
  remove.addEventListener("click",removeItem);


  let complete = document.createElement('button');
  complete.classList.add('complete');
  // add the SVG icon to the button
  complete.innerHTML = completeSVG;
  // add event listener for complete
  // this function will be defined later
  complete.addEventListener("click",completeItem);


  // append the buttons to the div
  buttons.appendChild(remove);
  buttons.appendChild(complete);

  // append the whole div to the li
  item.appendChild(buttons);

  // prepend the `li` to the `ul`
  list.insertBefore(item,list.childNodes[0]);
  }
Wow, that was a lot of code. Let’s break it down and see what we did:
- first we created a new
liwhere we are going to add the text and the two buttons - next we created a
divto hold our buttons - we created our two
button, adding the SVG icon that we set previously - we added an event listener to our
buttonto run functions that we define later - we appended our buttons to the
div, appended thedivto theliand prepended thelito theul.
We prepended the li because we want new tasks to appear on top and not at the bottom.
Complete and Remove tasks
Now it’s time to create our last two functions: completeItem and removeItem:
function completeItem(){
  // grab the `li` by targeting the parent of the parent of the button (button -> div -> li)
  let item = this.parentNode.parentNode;
  // grab the `ul` (li -> ul)
  let parent = item.parentNode;
  // grab the parent id
  let id = parent.id;

  // check if the item should go in the completed or if it should be re-added to todo by using a ternary operator
  let target = (id === "todo") ? document.getElementById("completed") : document.getElementById("todo");
  // remove the item to its current `ul`
  parent.removeChild(item);
  // add the item to the new `ul`
  target.insertBefore(item,target.childNodes[0]);
}
- first we grab our
lianduland the id of theul. - if the id is “todo” it means that the item, once checked will have to go in the “completed” list and viceversa, if the id is “completed” it means that the user wants to re-add the item to the todo list
- remove the item from its current
ul - add the item to the new
ul
Similarly we can do this for removeItem:
 function removeItem(){
    // grab the `li` by targeting the parent of the parent of the button (button -> div -> li)
    let item = this.parentNode.parentNode;
    // grab the `ul` (li -> ul)
    let parent  = item.parentNode;
    // remove `li` from `ul`
    parent.removeChild(item);
  }
- same as before we grab the
liandul - this time we don’t need the id, because we just want to remove the item from the list, whatever list it is
- we use
removeChild(item)to remove the item.
Conclusion
You now have a fully working todo list where you can add, remove and mark tasks as complete. Why don’t you try to add new functionalities to it? Or to style it in different ways?
If you liked this tutorial, remember to check out my JavaScript FREE ebook to learn all the new features introduced from E2015 to ES2018. You can read it and download it here for FREE.
Leave a Comment